Procedure

HDFS(Hadoop Distributed File System)(stored in blocks)->Split(# of split=# of map tasks)->Map(Assign each key with value; generate (key, value) pairs)->Shuffle->Reduce(aggregate value)->HDFS

Shuffle

Let’s focus on shuffle part.

All the data in the map node will be partitioned(hash to different reduce node). Reduce node will get all the data in the corresponding partitions from different map nodes and perform reduce task only once.

Shuffle taken on map node = Partition(# of partition=# of reduce node) + merge sort(based on key) + (optional) combiner

Output will be stored in a Ring Buffer(up to 80%). Then reduce nodes will capture spill files via HTTP. Reduce node will get data from memory and disk of map node. If the map task is not completed yet, reduce node will merge sort data in time and wait for map task to finish.

Shuffle taken on reduce node = all the spill file generated by this map task will be merged (based on partition number) and generate (key, {value_list}) pair.

Merge will generate value list (key, {value_list}). Combiner will perform reduce task to compress data (key, value). Combiner is designed to decrease the IO pressure (from map node to reduce node). Reduce node only need to load a combined file instead of many small spill file.

Prefab

Here is everything you need to know about pandas.

Environment

The following code is tested on Macbook Air (Apple Silicon). MacOS 12.3.

Anaconda

Refer to THIS.

Virtual environment

1
2
3
$ conda create -n <env name> python=3.9
$ conda activate <env name>
$ conda install pandas

Jupyter notebook

Refer to THIS

Dependency

1
2
3
4
5
6
numpy
pandas
xlrd
xlwt
openpyxl
tabulate
Read more »

发展顺序

本文仅关注从R-CNN、SPP-Net(2014)至Fast R-CNN、Faster R-CNN(2015)的图像分割技术。

R-CNN

Region-CNN

Efficient Graph-Based Image Segmentation

主要目的也就是将图像(image)分割成若干个特定的、具有独特性质的区域(region),然后从中提取出感兴趣的目标(object)。

为了找到有意义的图像区域,我们很容易想到根据灰度gradient变化,但是会产生下图问题:

左侧图像灰度变化均匀,右侧图像仅有部分区域有灰度变化。上图的例子告诉我们不能使用灰度的变化作为分割依据,也不能使用单一的灰度阈值来作为分割的评判标准。

Read more »

RNN

Recurrent Neural Network,循环神经网络。

RNN 是包含循环的网络,允许信息的持久化,可以充分利用先验的信息知识。

3

本质上RNN就是在\(t\)时刻,input=\(X _t + h _{t-1}\)

LSTM就是一种特殊的RNN。

对于RNN来说,在语言预测词汇中,对此要预测的词来说,相近的词贡献会很大,而时间间隔越远的词,贡献越少。但是往往存在Long-Term Dependency问题,一些重要信息可能会贯穿全文,如果很早出现但是被忘记,在后续的预测中将会很不利。理论上,RNN当然可以处理这种长期记忆问题,但是实践中却很难做到。为此LSTM出现了。

Read more »

What is chmod

chmod: Change the mode of each FILE to MODE.

Let's know something about the linux file permission

ls -l the first column will show the permissions for files.

1
2
3
4
5
6
7
8
$ ls -l
total 40
drwxr-xr-x 3 liwuchen staff 96 Jul 15 22:05 PaperSharing
-rwxr-xr-x 1 liwuchen staff 225 Jul 15 22:05 README.md
-rw-r--r-- 1 liwuchen staff 895 Jul 26 10:37 TODO.md
-rw-r--r--@ 1 liwuchen staff 1779 Jul 26 15:08 chmod.md
-rw-r--r-- 1 liwuchen staff 474 Jul 26 10:37 entropy.md
-rw-r--r-- 1 liwuchen staff 102 Jul 26 10:37 randomforest.md

On each line, the first character identifies the type of entry that is being listed.If it is a dash(-), it is a file. If is the letter d, it is a directory.

Read more »

Anaconda

CLICK HERE to install anaconda.

Update anaconda to the latest version via conda update anaconda.

conda -V to show your anaconda version. My version is conda 4.13.0.

Pytorch

  1. create new environment conda create -n <environment name> python=3.9

  2. change environment conda activate <environment name>

  3. install pytorch conda install -c pytorch pytorch

    PyTorch 1.12 supports GPU acceleration on Apple Silicon now.

Read more »

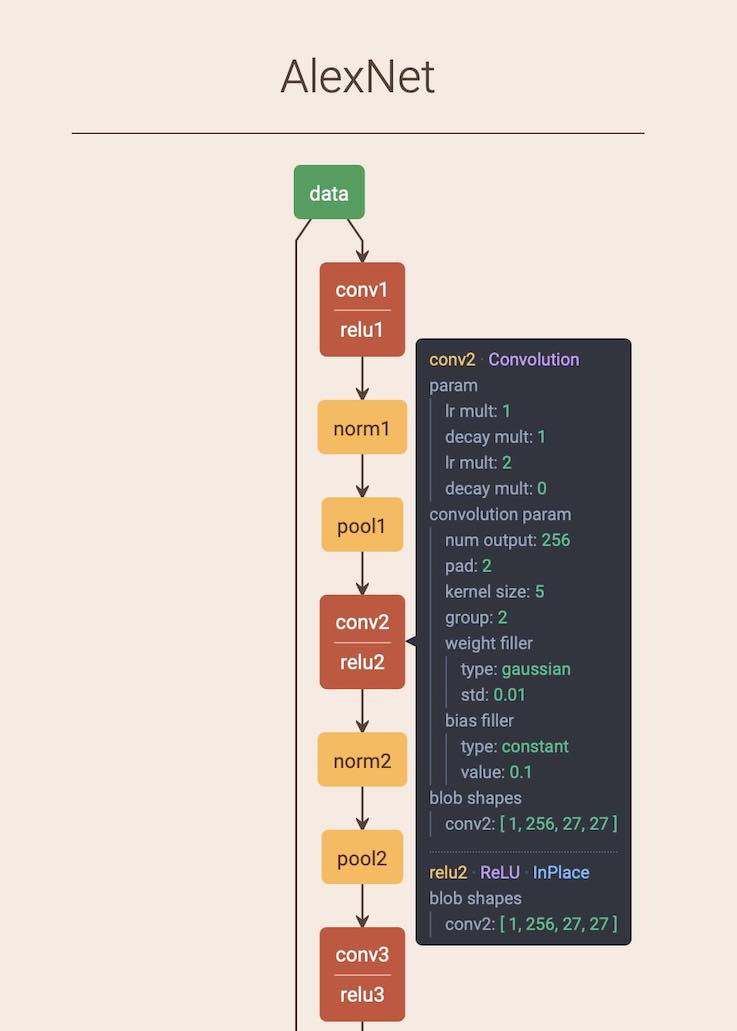
Netscope is a web-based tool for visualizing neural network architecture (technically any DAG, directed acyclic graph).

It currently only supports Caffe's prototxt format.

It is very handy to use, just drag the prototxt to the website and shift+enter to visualize the model.

Click Here

netscope

Environment

MacBook Air (M1, 2020)

1
2
$ zsh --version
zsh 5.8 (x86_64-apple-darwin21.0)

Install oh-my-zsh

  1. install via curl

    1
    sh -c "$(curl -fsSL https://raw.github.com/robbyrussell/oh-my-zsh/master/tools/install.sh)"

    In China, try gitee.

    1
    sh -c "$(curl -fsSL https://gitee.com/mirrors/oh-my-zsh/raw/master/tools/install.sh)"
  2. disable auto-update; uncomment the line

    1
    zstyle ':omz:update' mode disabled  # disable automatic updates
  3. change theme (find more official themes here)

    ZSH_THEME="apple"

Plugins for oh-my-zsh

  1. zsh-suggestion

    1
    2
    $ brew install zsh-autosuggestions
    $ echo "source /opt/homebrew/Cellar/zsh-autosuggestions/0.7.0/share/zsh-autosuggestions/zsh-autosuggestions.zsh" >>~/.zshrc
  2. zsh-syntax-highlighting

    1
    2
    $ brew install zsh-syntax-highlighting
    $ echo "source /opt/homebrew/Cellar/zsh-syntax-highlighting/0.7.1/share/zsh-syntax-highlighting/zsh-syntax-highlighting.zsh" >>~/.zshrc

Remember source ~/.zshrc to activate changes.

  1. display alias: alias
  2. temporary alias: alias <name>="<commands>"This alias only work in current shell.
  3. It you want to keep alias permanently, put alias in ~/.bashrc. note: remeber source ~/.bashrc after.

Here is a question: what is the difference between ./ and sh when executing a shell script?

  1. sh test.sh You pass test.sh as a parameter to sh.
  2. ./test.sh The system calls out the interpreter program and feeds in the scripts contents. So you will need a bang line(the very first line in the script and starts with #!). The rest part of the script will be passed to the program immediately after.

So you can run shell via #!/bin/bash. You can even run python via #!/usr/bin/python (the rest code is in python)

Here is the reference.

0%